In response to Muddy Red Shoe's request, here are some instructions about making buttons like those in my previous post.
FIRST - with pictures (which should be clearer and larger if you click on them) - "Dorset buttons" and variations. These are the buttons pictured 2nd in my post.
You need a blunt-ish darning-type needle (depending on thickness of thread) and a curtain ring, washer ... anything similar - to work around/over. (Tho plastic is possibly better for washable buttons)
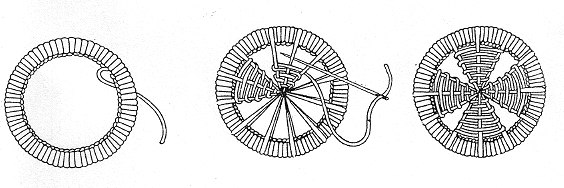
First, button stitch all the way around the ring. Then, you're supposed to push the line of little knots which this produces from the outer edge of the ring, in to the middle - this gives a neat edge. (Second part of diagram A.) On the red and cream buttons, I left this on the outside as it was a nice fuzzy effect, especially working with chenille.
A.

Next join a long thread on to the ring - wrap it around the ring (ie. across the diameter), to make the spokes, with each winding a little to the side of the previous one - A. part 3. Don't worry if the centre of the spokes doesn't look very central.
Use the same thread to centre and fix the spokes by stitching a cross or two in the middle.
The last stage (A. part 4) is to do a couple of rows of backstitch across the spokes, just inside the outer ring, with each stitch bringing together a spoke from the front with the matching one from the back. You can use the thread you were already using, or cast on a new thread. Cast off and then stitch a buttonhole loop at the back.
Of my buttons, the orange one and the little blue one were basically done like this - the orange first, which is why its a bit lumpy. Also - because it was a soft yarn which split easily - probably better to work with something a bit more solid (though not too fine) at least at first.
For variations, the backstitch can be overstitched with chain stitch, french knots and/or little beads can be added in various places - and you can, of course, do more than 2 rows of backstitch. And just using different types and colours of yarn makes a lot of difference.
Other variations:
B.
 This is the red and cream button on the left in my picture.
Same method as A., though you might want fewer spokes. Then you simply work the backstitch from the centre outwards, rather than from the edge, and fill the button with this stitching right to the outside edge. This button looks fairly different on front and back.
C.

This is the other red and cream button which I made, although I worked in sets of 2 spokes at a time, rather than 3 at a time as in the diagram (C) (because I hadn't counted the spokes properly first.....) The sets of 2 or 3 spokes are woven with the needle in an over-under / figure-of-eight pattern. Don't pull the thread too tight.
SECONDLY
The other buttons in my earlier post, at the top, were crotcheted - I don't have any diagrams, but these are very very easy. You don't need to be a particularly expert crotcheter (? - looks wrong) to do these. (Just as well, as I'm not ...)
Take your ring and chosen thread/yarn - you need a fair length, but can work from a spool/ball, you don't have to cut it before you start.
Take a loop towards the end of the yarn and pull it through the ring towards you from back to front, keeping hold of the end of the yarn at the back (the end will be secured by the first couple of stitches). Keep the hook through this loop, and pull another loop of yarn through it, over the top edge of the ring. Pull the yarn tight around the ring (not tooo tight) - and this gives you your first loop on the crotchet hook.
Does this sound like so much gobble-de-gook? or unknown Niddy-Noddy-speak? I think I must get/find/take some pictures - its much easier to learn by seeing and doing than by reading.
OK - pictures of this first stage below:


 You then work around the ring like this: put your hook through the ring from front to back, put yarn around hook, pull back through ring - 2 loops on the hook. Put the yarn around the hook from over the top and back of the ring, pull this through both loops - one loop on the hook. Repeat this until you've worked your way around the edge. Don't worry if the outside stitched edge seems to be pulling in. For anyone used to crotchet - this is double-chaining.


When you are back to the beginning make sure you have a fair length of yarn left - cut it off and/or join in a new length if necessary. Bring this end through the final loop you had on the hook and pull to secure it. Use a darning needle to thread the yarn through each of the chains on the outer edge, round and back to the beginning - then pull the yarn tight. This will pull the outer edge in to the middle, forming your button.


Depending on the ratio of the ring-size to the weight/thickness of the yarn, you may get a completely filled in button - like my purple ribbon button - or you may get a button with a hole in the middle, like this one, and the multi-coloured one. I could have crotcheted a few additional rows around the edge of this before finishing if I'd wanted it all filled in across the back. To do additional rows, you work another row of double-chaining through the first row rather than through the ring. Doing extra rows also gives you the acorn-cup effect.
I hope I haven't put anyone off with all these words ..... focus on the pictures, it really is quick and easy once you've had a bit of a practice. And curiously satisfying. Assuming you like buttons that is.
So there. After all that - someone had better just have a go!
There is a lovely button book which has instructions for these and lots more:
50 Heirloom Buttons to Make, Nancy Nehring, The Taunton Press 1996. ISBN 1-56158-146-1.
FIRST - with pictures (which should be clearer and larger if you click on them) - "Dorset buttons" and variations. These are the buttons pictured 2nd in my post.
You need a blunt-ish darning-type needle (depending on thickness of thread) and a curtain ring, washer ... anything similar - to work around/over. (Tho plastic is possibly better for washable buttons)
First, button stitch all the way around the ring. Then, you're supposed to push the line of little knots which this produces from the outer edge of the ring, in to the middle - this gives a neat edge. (Second part of diagram A.) On the red and cream buttons, I left this on the outside as it was a nice fuzzy effect, especially working with chenille.
A.

Next join a long thread on to the ring - wrap it around the ring (ie. across the diameter), to make the spokes, with each winding a little to the side of the previous one - A. part 3. Don't worry if the centre of the spokes doesn't look very central.
Use the same thread to centre and fix the spokes by stitching a cross or two in the middle.
The last stage (A. part 4) is to do a couple of rows of backstitch across the spokes, just inside the outer ring, with each stitch bringing together a spoke from the front with the matching one from the back. You can use the thread you were already using, or cast on a new thread. Cast off and then stitch a buttonhole loop at the back.
Of my buttons, the orange one and the little blue one were basically done like this - the orange first, which is why its a bit lumpy. Also - because it was a soft yarn which split easily - probably better to work with something a bit more solid (though not too fine) at least at first.
For variations, the backstitch can be overstitched with chain stitch, french knots and/or little beads can be added in various places - and you can, of course, do more than 2 rows of backstitch. And just using different types and colours of yarn makes a lot of difference.
Other variations:
B.
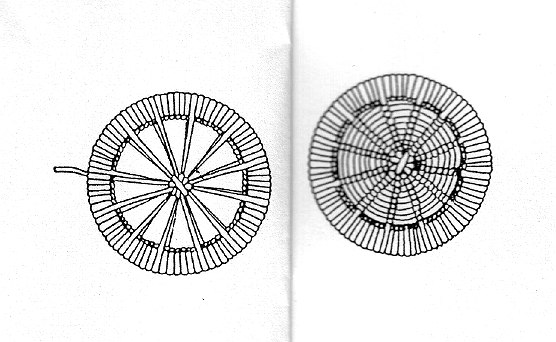 This is the red and cream button on the left in my picture.
Same method as A., though you might want fewer spokes. Then you simply work the backstitch from the centre outwards, rather than from the edge, and fill the button with this stitching right to the outside edge. This button looks fairly different on front and back.
C.
This is the other red and cream button which I made, although I worked in sets of 2 spokes at a time, rather than 3 at a time as in the diagram (C) (because I hadn't counted the spokes properly first.....) The sets of 2 or 3 spokes are woven with the needle in an over-under / figure-of-eight pattern. Don't pull the thread too tight.
SECONDLY
The other buttons in my earlier post, at the top, were crotcheted - I don't have any diagrams, but these are very very easy. You don't need to be a particularly expert crotcheter (? - looks wrong) to do these. (Just as well, as I'm not ...)
Take your ring and chosen thread/yarn - you need a fair length, but can work from a spool/ball, you don't have to cut it before you start.
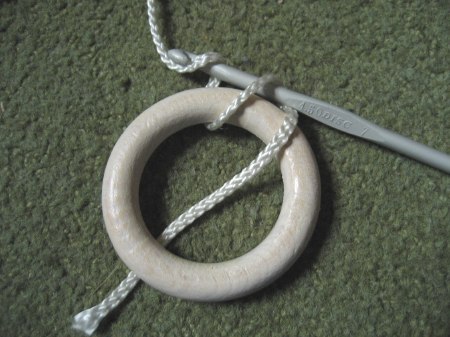
Take a loop towards the end of the yarn and pull it through the ring towards you from back to front, keeping hold of the end of the yarn at the back (the end will be secured by the first couple of stitches). Keep the hook through this loop, and pull another loop of yarn through it, over the top edge of the ring. Pull the yarn tight around the ring (not tooo tight) - and this gives you your first loop on the crotchet hook.
Does this sound like so much gobble-de-gook? or unknown Niddy-Noddy-speak? I think I must get/find/take some pictures - its much easier to learn by seeing and doing than by reading.
OK - pictures of this first stage below:

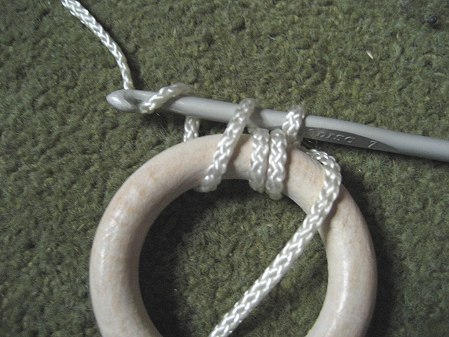 You then work around the ring like this: put your hook through the ring from front to back, put yarn around hook, pull back through ring - 2 loops on the hook. Put the yarn around the hook from over the top and back of the ring, pull this through both loops - one loop on the hook. Repeat this until you've worked your way around the edge. Don't worry if the outside stitched edge seems to be pulling in. For anyone used to crotchet - this is double-chaining.

When you are back to the beginning make sure you have a fair length of yarn left - cut it off and/or join in a new length if necessary. Bring this end through the final loop you had on the hook and pull to secure it. Use a darning needle to thread the yarn through each of the chains on the outer edge, round and back to the beginning - then pull the yarn tight. This will pull the outer edge in to the middle, forming your button.


Depending on the ratio of the ring-size to the weight/thickness of the yarn, you may get a completely filled in button - like my purple ribbon button - or you may get a button with a hole in the middle, like this one, and the multi-coloured one. I could have crotcheted a few additional rows around the edge of this before finishing if I'd wanted it all filled in across the back. To do additional rows, you work another row of double-chaining through the first row rather than through the ring. Doing extra rows also gives you the acorn-cup effect.
I hope I haven't put anyone off with all these words ..... focus on the pictures, it really is quick and easy once you've had a bit of a practice. And curiously satisfying. Assuming you like buttons that is.
So there. After all that - someone had better just have a go!
There is a lovely button book which has instructions for these and lots more:
50 Heirloom Buttons to Make, Nancy Nehring, The Taunton Press 1996. ISBN 1-56158-146-1.
Comments
Great explanation and diagram, I might even have a go as I need a decoration for a wedding hat!
But I can be quite crotchety.
Yes, have a go!!!